This is an easy to use, step-by-step guide for using Tag Manager and Analytics to track Events and Goals.
Navigate to the different sections from here:
Setting Up Tag Manager for a Website
Creating Triggers and Tags in Tag Manager
Testing Tags and Using Tag Manager’s ‘Preview Mode’ to Set Up New Triggers
Using Tags to Trigger Events and Goals in Analytics
Trigger Analytics Property ID and Remarketing Tags Using Tag Manager
Setting Up Tag Manager for a Website
In my quest to understand how to properly set up and use Google Tag Manager, I found answers by piecing together bits and pieces from several different sources. It was a frustrating process and it took me a long time to figure out how to make things work (and I still have a LOT to learn!).
With this blog post I will attempt to explain – using simple, step-by-step instructions – how to set up and use Google Tag Manager to track events and goals on your website.
So first off, I will do my best to answer the question: How do I set up Tag Manager on my website?
1. Go to: https://tagmanager.google.com/ and login with your Google account – or create a new one if you don’t have one already.
2. On the Tag Manager Dashboard, click ‘Create Account’:
3. On the Next page, give the new account a name (A) – usually the name of the business that owns the website. Click ‘Continue’ then enter the domain name (B) – do not include ‘http://’. Click the ‘WEB’ button (C) and then click the ‘CREATE’ link (D):
4. The next page will have the Tag Manager codes you need to add to your site. Copy the top code (A):
and paste this code into the ‘Head’ section of your site’s web pages. The ideal spot for the code is just before the closing </head> tag (‘A’ below). If you use WordPress or another CMS (Content Management System), you can do this in your ‘header.php’ template file:
if your site is pure HTML, then you will need to add this code to the same area of your web pages, you’ll just need to do it for each page on your website.
5. Now copy the second snippet of code from Tag Manager (B):
and paste this code just after the opening <body> tag (B) in your ‘header.php’ template file (depending on your CMS) or into all of your static HTML pages:
6. Click ‘OK’ in Tag Manager, then click ‘Variables’ in the left menu:
7. Under ‘User-Defined Variables’, click ‘NEW’:
8. Give your new Variable a new title – call it ‘Analytics’ (A):
9. Click the ‘Variable Configuration’ area (‘B’ above), then scroll down a bit and choose ‘Google Analytics Settings’ (‘A’ Below):
10. Go to your Analytics account and load up the dashboard for the site you are working on. At the bottom left, click ‘ADMIN’:
11. In the ‘Property’ column click ‘Tracking Info’ (A), then, click ‘Tracking Code’ (B):
12. Highlight and copy the ‘Tracking ID’ (A):
13. Go back to Tag Manager and paste the ‘Tracking ID’ into the corresponding field (A), then click ‘SAVE’ (B):
14. Now click ‘CONFIGURE’ in the ‘Built-In Variables’ section:
15. From here you can activate all built-in variables available. Here are the ones I recommend activating:
Under ‘Clicks’ (A):
Click Element
Click Classes
Click ID
Click URL
Click Text
Under ‘Forms’ (B):
Form Element
Form Classes
Form ID
Form URL
Form Text
16. Close the ‘Configure Built-In Variables’ tab (C above).
And there it is – a (hopefully) simple step-by-step guide showing you how to create a Google Tag Manager Account and install it to your website.
The next section covers how to create Triggers in Tag Manager:
Creating Triggers and Tags in Tag Manager
In this section I will work toward answering the question: How do I create triggers and tags in Google Tag Manager?
Triggers are an important step toward tracking a variety of ‘events’ on your website. An event is an action a visitor to your site makes, such as clicking a phone number, a submit button on a contact form, etc…
Here are the steps to create a basic trigger:
1. Login to your Tag Manager account here: https://tagmanager.google.com/
2. Go to the account you created in Section 1.
3. Click on the ‘Triggers’ option in the left menu:
4. Click the ‘NEW’ button (A), then click anywhere in the ‘Trigger Configuration’ box (B):
5. You will see several options in a list – I suggest you experiment and play around with some of these after you’ve set up the basic tags I am showing you here.
Click on ‘All Elements’:
6. Click the ‘Some Clicks’ radio button:
7. Now open your website and find the element you would like to track. In this case I am going to track when someone clicks on an image link on my website.
You’ll need to use a modern browser for the following – Chrome is best.
Right-click (cmd click on Mac) on the link, then click ‘Inspect’:
8. In the inspector you can see I’ve added a class to the image called ‘android-download’ (A above).
9. Now go back to Tag Manager and change the first drop down (A) to ‘Click Classes’, make sure the second drop down says ‘contains’ (B) and enter the class of the element you want to track in the third field (C):
Give your trigger a new title (D above), then click ‘SAVE’ (E).
10. Now click the ‘Tags’ option in the left menu (A) and click the ‘NEW’ button (B):
11. Click anywhere in the ‘Triggering’ box (A):
12. Click on the trigger you just created (if you have created several tags, choose the appropriate trigger for the tag you are creating):
13. Now click anywhere in the ‘Tag Configuration’ box:
14. Choose the ‘Universal Analytics’ tag:
15. From here, click the drop down under ‘Google Analytics Settings’ (A) and choose ‘{{Analytics}}’, then click on the drop down under ‘Track Type’ (B) and choose ‘Event’:
16. Give your tag an appropriate title (A), then under the ‘Event Tracking Parameters’, enter some text that makes sense for what you are trying to track (B). When you’re done, click ‘SAVE’ (C):
That is how to create a basic Trigger and Tag in Google’s Tag Manager. In the next section I will explain how to test the Tag using ‘Preview Mode’ and also how to use Preview Mode to help you quickly set up more tags.
Testing Tags and Using Tag Manager’s ‘Preview Mode’ to Set Up New triggers
In this section I will answer the question: How do I test my Google Tag Manager tags, and how can I use Preview Mode to set up new triggers and tags?
Now that you’ve got some basic triggers and tags set up, you need to test them to make sure they work! Tag Manager has a ‘Preview Mode’ that is very helpful in a few ways. You can use Preview Mode to test the triggers and tags you have created, but you can also use it to help you set up more triggers. Preview Mode is very helpful in setting up trickier tags as well as it can help you zero in on the specific conditions you need to look for to create new triggers.
1. You’ll need to use Google’s Chrome browser for Preview Mode to work, so be sure you are using Chrome for the following steps.
2. Login to your Tag Manager account here: https://tagmanager.google.com/
3. Go to the account you created in Section 1 and used in Section 2.
4. Click on the ‘Triggers’ option in the left menu:
5. Now click the ‘Preview’ button at the top right (A):
6. You’ll see an orange message box telling you that you are in Preview Mode (B above).
7. Now open a new tab in Chrome and load the website you’ve added this Tag Manager account to. You should see the homepage and a Google Tag Manager frame will appear at the bottom of your browser:
If you don’t see this frame at the bottom of your browser, then you either haven’t installed the Google Tag Manager code, or installed it incorrectly – you’ll need to go back to Step 1 and follow the instructions for installing Tag Manager to your site.
8. Now scroll to the area of the page that contains the element you have set up the trigger and tag for. Click the element (A) and if you have set up the trigger and tag correctly, you’ll see a message appear under the ‘Tags Fired On This Page’ section (B) like this:
9. If you see this message – congratulations! You have set up your trigger and tag correctly! If not, then you will need to troubleshoot why the trigger and tag aren’t working. Preview Mode is amazingly helpful in doing just that!
Troubleshooting uses the exact same methods that you can use to help set up new triggers. So, since my trigger/tag is working, let’s focus on the button to the left (which I haven’t set up a trigger for).
If I click that button, no message pops up saying a Tag was triggered, but you’ll notice under ‘Summary’ that every event on the page is recorded and when I click on the other button, a new event was recorded:
10. I can use the data associated with this event to zero in on the specific element I need to use for my trigger. 1st, click on the new event under Summary – in this case ‘5 gtm.click (A):
Then, in the top section, click the ‘Variables’ tab (B).
11. Here we have a bunch of data associated with the event I triggered when I clicked on the button. Scroll down and have a look at it all. The bit of data I find easiest to use for triggers is in the ‘Click Classes’ row (A):
12. Of course, you can use any of these elements to help you set up or fix your triggers. Back in Tag Manager and looking at the tag we’ve created, you can see there are several options you can choose from when deciding what is going to set off the trigger:
13. Back on the site preview page, you can see that I’ve added an extra class to the button ‘ios-download’ (B):
14. Back in Tag Manager, I can use that to set off my trigger. For this example I’m going to switch the Android code to the IOS class to illustrate how it can be used to troubleshoot and modify triggers. I’ll do this by changing the ‘Click Classes’ from ‘android-download’:
to ‘ios-download’ (A) and clicking ‘SAVE’ (B):
15. Now I need to click ‘Refresh’ in the Preview Mode box:
16. Switch back to the tab with your webpage loaded and refresh the page. When I click the IOS download button, I can see it has triggered the Android event:
17. You can use this technique to find what data to use when you set up new triggers, and to troubleshoot triggers you are having problems with.
For example if I click on an element I haven’t set up to trigger an event like the ‘SEE ALL NEWS’ button, I can get data from that event in the Preview panel to help me create the appropriate trigger. It is usually best to hold the ctrl or cmd key when you click a link so you don’t move away from the page and lose the event data:
18. When I look at Variable data associated with this event (‘4 gtm.click’ under the ‘Summary’ section), I can see I have a lot of options. Under ‘Click Classes’ I can see a whole list of classes (‘A’ above) I can use for my trigger – or I can go into the code of that element and add a custom class to be more specific. I can also use the data from the ‘Click Test’ row in my trigger (‘B’ above).
19. So, if I go back to Tag Manager and set up a new Trigger like this:
You can see I’ve used one of the classes from the Preview page (vc_btn3) and by clicking the plus (+) sign to the far right of that trigger (A), I’ve added another condition using the ‘Click Text’ data (B) to further specify what Tag Manager should look for before firing the trigger.
You can add as many conditions as you’d like here, and you can play with the middle dropdown (C – ‘contains’) to be even more specific.
20. Now I set up a new Tag using that trigger:
21. Click ‘Refresh’ again (See Step 15) and test your new Tag:
22. Works like a charm! Now click the ‘Leave Preview Mode’ link:
That’s how you can test new triggers, troubleshoot triggers/tags that aren’t working and also work out what data to use when setting up new triggers.
In the next section I’ll walk you through how to make your Tags live, connect them to Goals, and test them in Analytics.
Using Tags to Trigger Events and Goals in Analytics
In this final section I will show you how to setup Goals in Analytics so you can track Events on your website.
1. Login to your Tag Manager account here: https://tagmanager.google.com/
2. Go to the account you created in Section 1 and used in Section 2.
3. Click on the ‘Tags’ option in the left menu:
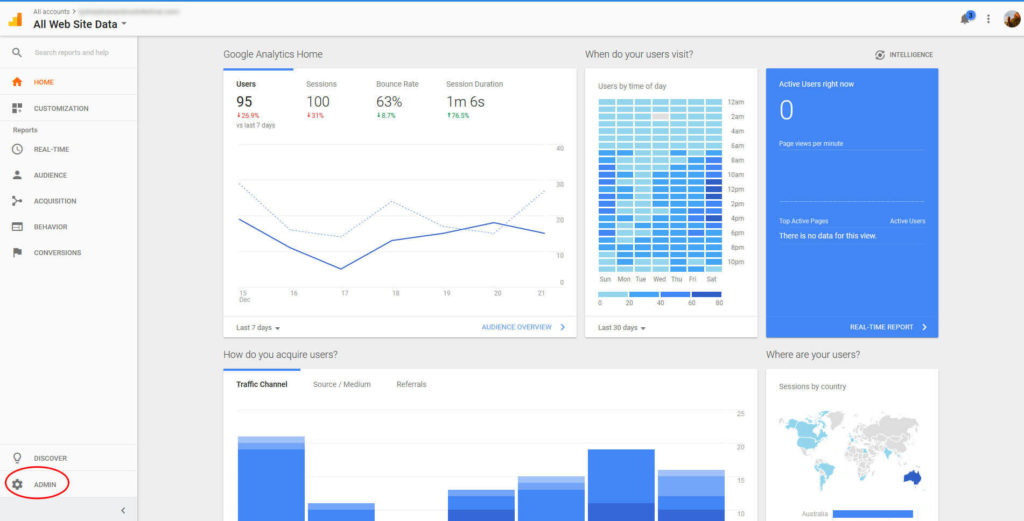
4. Now login to your Analytics account and load up the Account/Property for the website you are working on and click on the ‘ADMIN’ link at the bottom left:
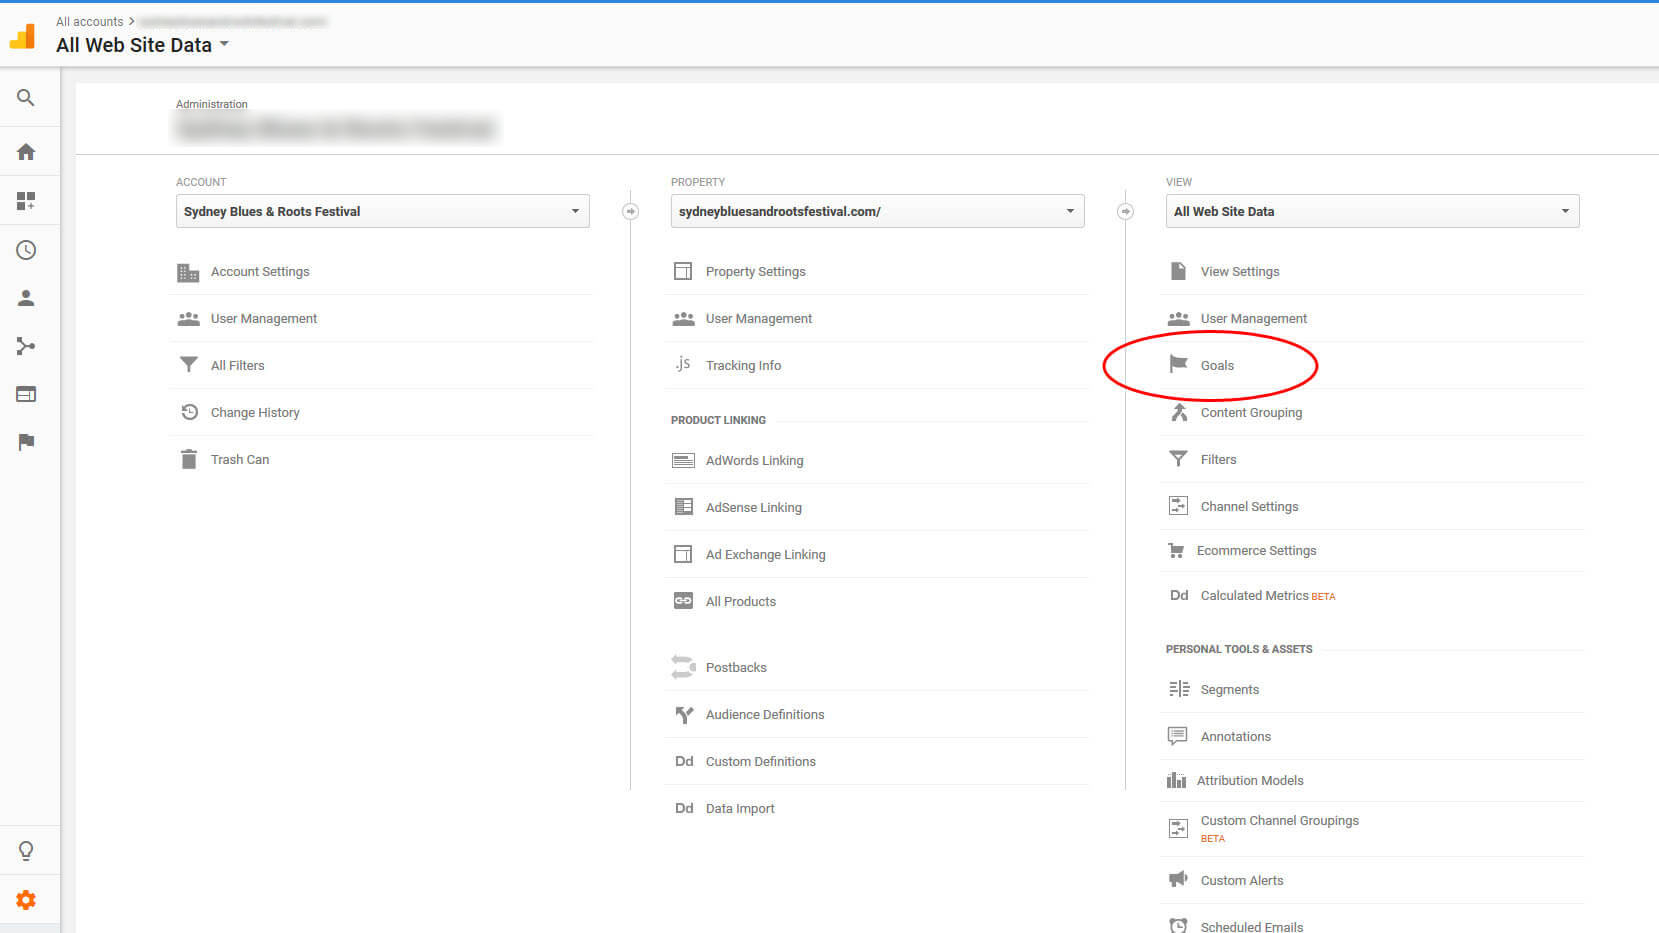
5. In the far right column (VIEW Column), click on ‘Goals’:
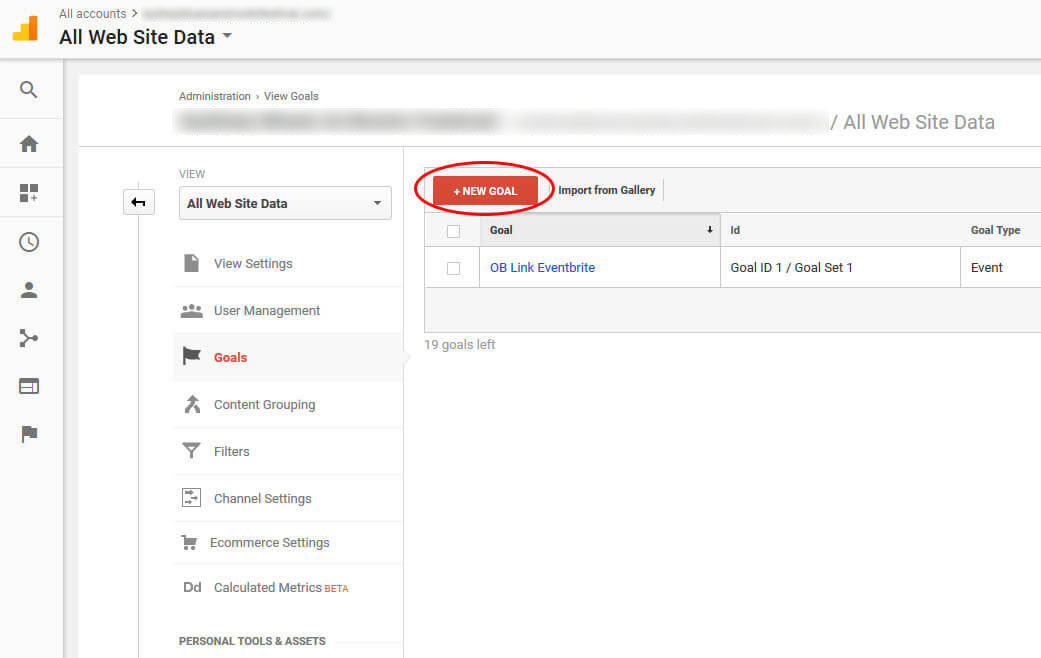
6. Click ‘New Goal’:
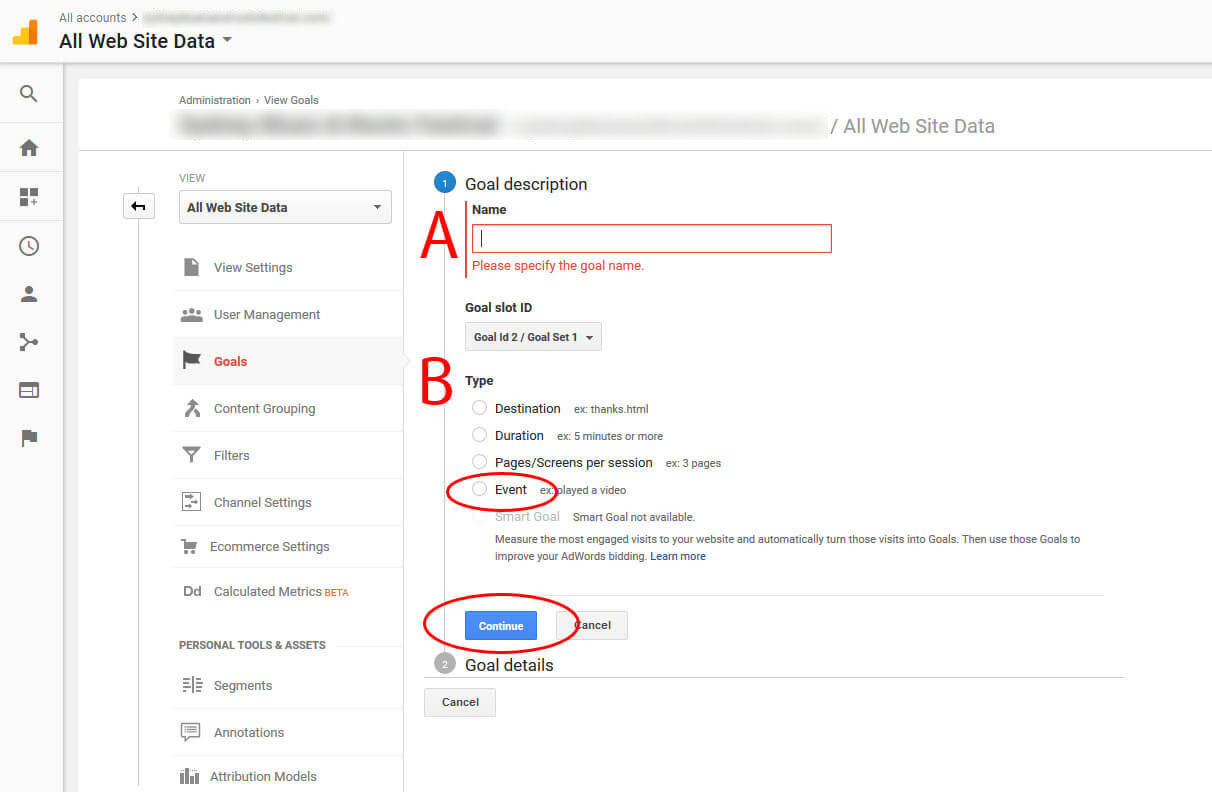
7. Give your Goal a name (A) – I usually name it the same as or close to the Tag I have set up in Tag Manager. In this case I am going to call my Goal ‘Android Download’:
Then you tick the ‘Event’ option under ‘Type’ (‘B’ above), and click ‘Continue’.
8. Back in Tag Manager, click the title of the corresponding Tag:
9. Now click anywhere in the ‘Tag Configuration’ table:
10. When you look at the Analytics Goal settings next to the Tag Configuration table, you’ll see they correspond to each other:
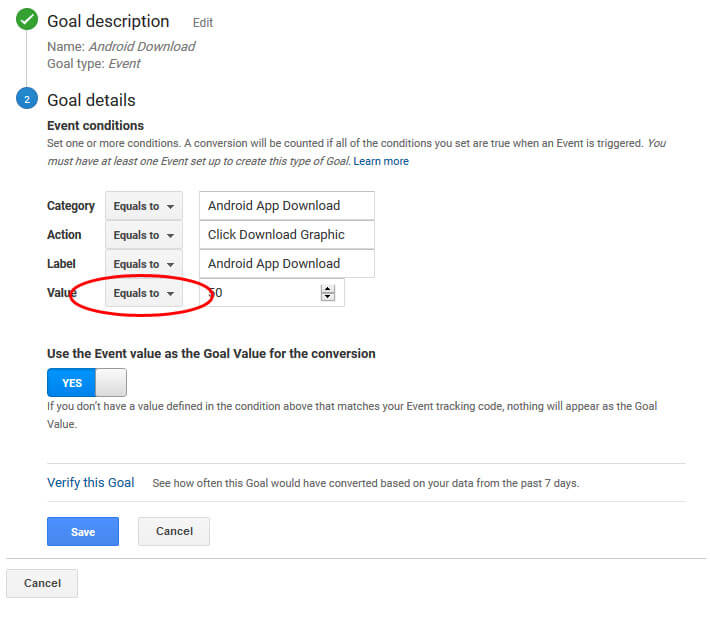
11. Just copy and paste the values from the Tag Configuration into the corresponding fields in the Analytics Goal. So, copy the value in the ‘Category’ field in Tag Manager and paste it into the ‘Category’ field in Analytics. Do this for all fields:
12. For the ‘Value’ field, you must change the dropdown from ‘Greater Than’ to ‘Equals to’:
Then click ‘SAVE’ in Analytics.
13. You’ll see your goal in the list now. Next, click on the ‘Real-Time’ icon in the left menu:
14. And choose ‘Events’:
15. Load your website in another tab or browser and you should see yourself as a visitor on the site in the ‘Right now’ area:
16. Now click the element on your website that triggers the Tag we created in the previous tutorial. In this case it’s the ‘Android Download’ button:
17. Back in Analytics, you can see the Event has been triggered:
18. Under the ‘Real-Time’ menu at the left, click on ‘Conversions’ and you’ll see a similar page. You should also see a corresponding Goal triggered:
You don’t have to setup Tags to be Goals to track them as Events. If you only want to track events, skip setting up the goals and the Events will be tracked.
So there you go – now you know to track Events and Goals in Analytics using Tag Manager!
Trigger Analytics Property ID and Remarketing Tags Using Tag Manager
In this section I will show you how to use Tag Manager for Google Analytics and Ads Remarketing. Using Tag Manager to track these things will prevent you having to add multiple snippets of code to your site and will speed up your Analytics and Ads setup.
Please Note: I will refer you to the other Tag Manager tutorials above for certain aspects of the setup.
Here are the steps to follow to setup Analytics with Tag Manager:
1. If you haven’t setup Tag Manager on your site, please follow the steps in this tutorial first, then return to this lesson.
2. Login to your Tag Manager account here: https://tagmanager.google.com/
3. Go to the Tag Manager account you want to work with.
4. Click on the ‘Tags’ option in the left menu
5. In Part 1 of my this Tag Manager tutorial, you setup an ‘Analytics Variable’. Now you can use that variable to track page views and collect Analytics data for your website.
6. Click ‘NEW’ and make the title ‘Page Views’. Then, click anywhere in the ‘Triggering’ field:
7. Click on the ‘All Pages’ trigger:
8. Now click anywhere in the ‘Tag Configuration’ field:
9. And choose ‘Universal Analytics’:
10. Click the dropdown under ‘Google Analytics Settings’ and choose {{Analytics}}:
11. Click ‘SAVE’
Now we will add the Remarketing Tag. If you don’t need to add this tag, just skip to step 25 and finish the tutorial.
1. Finding the Remarketing Tag ID for your Ads campaign is a whole other process – here is a good resource for setting up your Remarketing Campaign (which you’ll need to do before proceeding):
https://support.google.com/adwords/answer/3210317
2. Once you’ve setup a Remarketing Campaign, you should be given a code to add to your website. Rather than do that, just find and copy the Conversion ID (circled below):
3. Now follow steps 6 thru 8 above – NOTE: make the title ‘Remarketing’ rather than ‘Page Views’ in Step 6.
4. After you’ve clicked the ‘Tag Configuration’ field, choose the ‘Ads Remarketing’ Tag:
5. Now paste your Conversion ID into the Conversion ID field:
6. You can generally leave the ‘Conversion Label’ blank – you will likely know if/when you need to fill that field. We will leave it blank.
7. Click ‘SAVE’.
8. Now click the ‘SUBMIT’ button at the top right, give your submission a Version Name and click ‘PUBLISH’
9. You should have installed the Tag Manager codes to your site already (in the section one of this Tag Manager tutorial). Now you can remove all old Analytics codes (and Remarketing codes) from your site – Tag Manager will trigger all of those from now on.
10. You can test your site to make sure everything is working by using ‘Tag Assistant’ in Google’s Chrome browser. Follow the link above to install it and learn how to use it.
If you follow these steps, you will shorten the amount of time you spend setting up Analytics and Remarketing for Ads on your site.






This Post Has 0 Comments